Thursday, August 13, 2009

How to Make a Girl's Diary, Notebook or Journal


Craft Fun Foam Diary
What You Need:

  • Diary Cover Pattern
  • Diary Pages
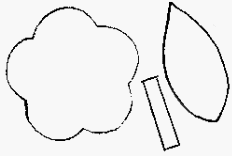
  • Flower pattern or your choice of pre-cut foam shapes (or use stickers, pictures cut from magazines, or whatever cover decorations appeal the most to you)
  • For a notebook or journal, you will need a supply of lined or blank paper
  • Craft fun foam sheets in a variety of colors
  • hole punch
  • Ribbon
  • small tab of velcro
  • letter beads (optional)
  • tacky craft glue or low-temperature hot glue
Girl's Diary or Notebook
Craft Instructions:


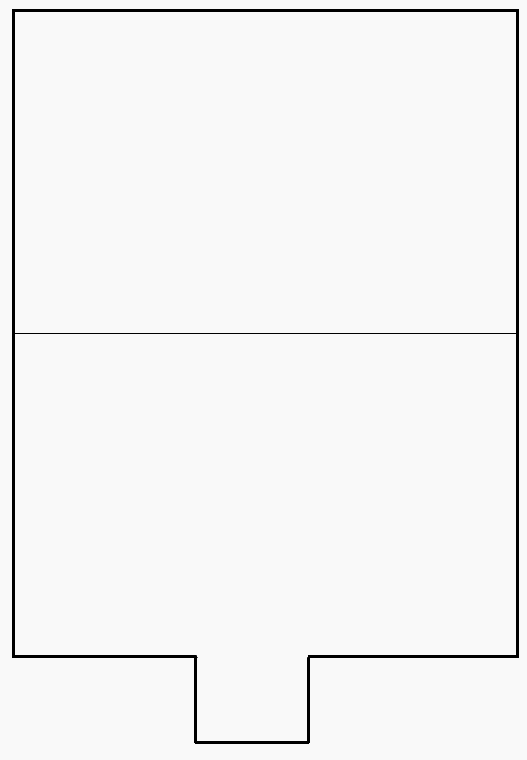
To make a girl's diary, print and cut out all the patterns, including at least four of the two inside diary pages.

To make a notebook or journal, print the cover pattern, the flower pattern (if using), and one sheet of the diary pages to cut out and use as a template for your own lined or blank paper.

Trace around the cover pattern and flower patterns on desired craft foam colors and cut out.

Cut the foam cover in half, where the center line is shown on the pattern, to make separate front and back pieces.

Line up the cover, with the tabbed section on the front and one of the diary pages inside. Use the paper punch to make three equally spaced holes on the left-hand side.

Stack the remaining inside pages, keeping them lined up neatly. Place the hole-punched diary page on top of these pages to show you where to make the remaining punch holes. Punch through all the pages.

Line up the top cover, inside pages, and the back cover, then thread a length of ribbon or yarn through each of the holes and tie in a bow at the front.

Glue on the flowers or other cover decorations.

Hot glue a small square of velcro on the inside of the tabbed latch. Glue the matching piece of velcro to the back of the diary to keep it closed.

If you don't have velcro, you could cut off the tab completely, leaving the diary as an open book. Alternatively, you can punch a hole at the end of the tab, punch a matching hole in the back cover, and tie the diary closed with ribbon.

Filled Glass Ornament

Gather your family and make these pretty glass ornaments–filled with just about anything. The possibilities are endless…

Step 1: Buy a pack of clear, glass ornaments. You can find them nearly everywhere, but if you go to a craft store like Michael’s or Robert’s–they were a bit cheaper. Laurie says, to try the dollar store too. These ones were about $3.00 for 12.

Step 2: You must solemnly swear not to skip this step–even if you think you are very careful and brave. Just mind me anyway. Take a small strip of masking tape and put it around the top of the ornament. Fold the top of the tape down inside so that no sharp edges are exposed anywhere.

This could actually be a project that you do with a middle aged child–as long as the edges are covered and they remember to handle the glass carefully. I know, I know…I sound like somebody’s mom. Sorry.

Step 3: Curl and cut up tons of curly ribbon…no kidding…tons. Kids would love this part too.

Step 4: Wad up bunches of ribbon and stuff it in the glass ball. Snap in the gold ornament topper. It’s that simple–you’re done!

Try filling some of the ornaments with random things—we used old video tape, yarn, raffia, and yes…those are push pins. Just be ok with letting everyone’s personality come out. Lyndi thinks gummy bears would be good. I’m a Cheetoes kinda gal myself, but they won’t fit…I know. I tried.

The good thing is that you can always empty it again if you don’t like how they look. Chances are—you’ll just love them!


Dog-Bone Wreath


CRAFT MATERIALS:

12-inch cardboard circle, or a 12-inch Styrofoam wreath (available at craft supply stores)
Scissors
5 yards of ribbon and matching bow
Large dog bones
Dog toys
Tape
Evergreens, optional

Time needed: Under 1 Hour
1. If using the cardboard round, trace an 8-inch circle in the middle of it (a small mixing bowl or plate will be approximately the right size). With the scissors, cut out the inner circle, leaving a ring or wreath shape.
2. Tape the ribbon onto the back of the cardboard wreath or tie it to the Styrofoam wreath and start winding it around the circle on a slight diagonal. Once you have come full circle, cut the ribbon and tape it down.
3. Next, cut ten or so 9-inch lengths of ribbon for attaching the dog bones and toys. Attach eat treat separately by first placing the dog bone or toy on the wreath and securing it by placing a length of ribbon across it. Flip the wreath over and tie the ribbon securely in a knot, making sure there is no slack in the loop around the bone or toy. (This tying method allows the items to be removed one at a time without displacing the others.) Continue tying on the bones and toys in this fashion, leavi
4. For a fuller look, tape greens onto the cardboard round or push the ends into the Styrofoam wreath. With the remaining length of ribbon, tie a loop on the back of the wreath at the top so that it can be easily hung for all to see -- especially the puppy dog.

Christmas Candleholder

Cast a glow on children's faces with this simple, charming hand-painted candleholder. Follow the winter theme by turning the snowman into a snowflake or a Menorah.

What you'll need:

  • Baby food jar (emptied and rinsed out)
  • Paint
  • Ribbon
  • Tea light candle
  • Paintbrush

How to make it:

  1. Empty out and wash jar.
  2. Tie ribbon around the top, but back from the edge so the flame can't reach it.
  3. Paint any kind of design you wish on the jar. Try snowflakes, hearts, tree ornaments, etc.
  4. Put small candle inside.
  5. Light and watch how pretty it is.

Wednesday, August 12, 2009

Chicks in a Basket


Putting all your eggs in one basket is a bad idea, of course, but put all these chicks in a basket, and you've got one very cute centerpiece.

CRAFT MATERIALS:

Kitchen shears
Small basket
Yellow work glove
Craft glue
Scissors
Felt
Small googly eyes
Easter grass
Ribbon or flat braid (optional)

Time needed: Under 1 Hour
1. Use the kitchen shears to cut a whole in the bottom of your basket that's big enough for your child to fit her hand through.
2. Stick the work glove up through the hole, leaving the cuff out.
3. Secure the cuff to the bottom with craft glue.
4. Tuck the thumb of the glove into the basket and glue it out of sight.
5. Cut four small triangular beaks out of the orange felt and four small combs out of the yellow felt.
6. Glue the combs to the tops of each gloved finger; glue the beaks -- slightly curved -- onto each "face."
7. Complete each face by gluing on a pair of googly eyes.
8. Add a small handful of Easter grass around the chicks in the basket.
Variations:
If desired, decorate the handle by wrapping it with pretty ribbon or braid.

Painting Pots

We cannot paint the walls of our house but we can definitely paint the pots in our house.

All you need is:

1. Poster paints.

2. Paint brush.

Step 1: Pick up a pot and remove any dust from it using a soft cloth or a brush.

Step 2: If you have earthern pots, give them a coating of colour that you think would match with the colour of your walls.

Step 3: Let this base colour dry. Now you can paint a variety of patterns on top to decorate your pots.

If your pots are cemented and polished, you can directly make patterns on them. It's quite interesting and at the same time colourful and attractive too.

Tin Can Lantern

Are you bored of having dinner under the same electric lights? Here is something to light up your family meal time.

The things you need:
1. An empty soft drink can or a tin
2. A hammer
3. A few nails
4. A 15-inch long wire

Step 1: On the outside part of a can, draw any pattern that you like.

Step 2: With the nail tips, hammer holes of various sizes, according to the pattern that you have drawn. Be sure to make two holes near the top, on opposite sides, for stringing a handle.

Step 3: String the wire through the holes at the top and secure the ends by winding the wire a couple of times around the holes.

You can use a small bit of plastic clay to fix the candle to the bottom of the can. Your lantern is ready to brighten up your dinner time. And watch out for the exciting shadows it throws.